
Last updated on April 15th, 2025 at 04:07 pm
When you think about comfort food, there’s often one particular treat that takes you back to your happiest moments. Maybe it was the scent of melted chocolate swirling through your childhood home, or the feeling of sneaking a taste from the mixing bowl when no one was looking. If peanut butter and chocolate were part of your upbringing, then you already know the pure joy that chocolate covered peanut butter balls can bring.
There’s a reason this classic treat has stuck around for generations. The blend of smooth peanut butter wrapped in rich chocolate is a taste combination that never grows old. Whether you’re preparing them for the holidays, making an edible gift, or just craving something sweet without a bakery run, these little spheres of delight hit the spot every single time.
Let’s take a closer look at why this homemade snack is more than just a candy — and how you can make them perfectly, every single time.
Table of Contents
Why You’ll Love Chocolate Covered Peanut Butter Balls
Before you reach for that store-bought candy bar, you might want to consider why making chocolate covered peanut butter balls at home is worth the extra few minutes. Besides the irresistible flavor, you’re giving yourself complete control over the ingredients, the sweetness, and even the texture. Here’s why this recipe belongs in your dessert rotation.
- You get to skip artificial preservatives and questionable sweeteners.
- Feel free to adjust the sweetness to suit your personal preference.
- You can create the perfect texture by choosing your preferred chocolate and peanut butter brands.
- You save money by making a big batch at home.
- You end up with a versatile treat for snacking, sharing, or gifting.
There’s also a personal satisfaction that comes with biting into something you made from scratch, and you’ll be surprised how quickly these disappear once you set them on the table.
Ingredients for Chocolate Covered Peanut Butter Balls
One of the best parts about this recipe is how few ingredients you actually need. Most of these are already sitting in your pantry, just waiting to be turned into a sweet masterpiece.
| Ingredient | Quantity |
|---|---|
| Creamy peanut butter | 1 cup |
| Unsalted butter (softened) | 1/4 cup |
| Powdered sugar | 2 cups |
| Semi-sweet chocolate chips | 2 cups |
| Coconut oil or shortening | 1 tbsp (optional) |
These ingredients form the foundation of your peanut butter balls. You’ll find that using high-quality chocolate and a smooth, well-balanced peanut butter makes all the difference when it comes to both flavor and texture.
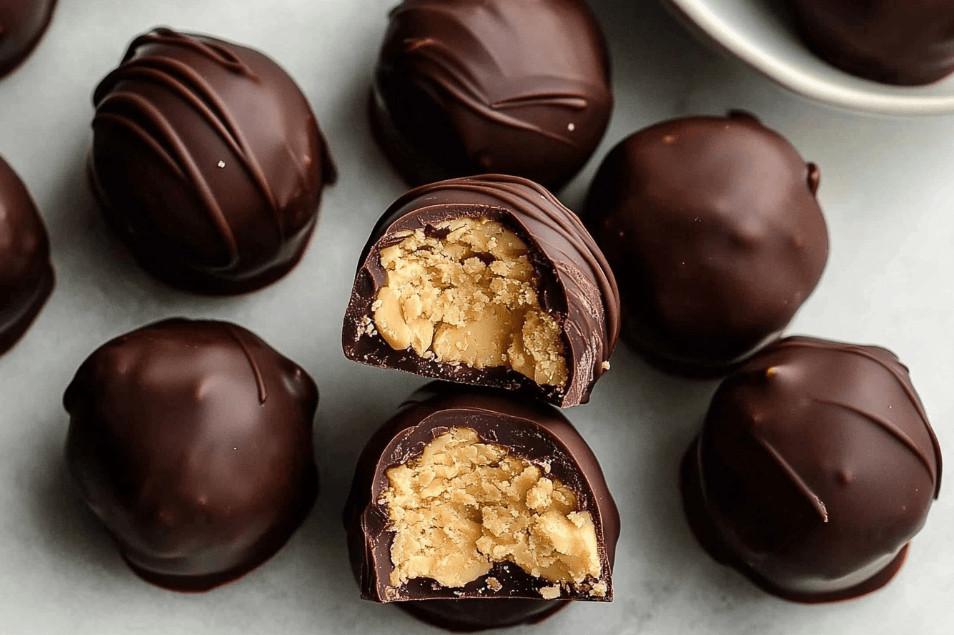
How to Make Chocolate Covered Peanut Butter Balls
If you’ve ever felt intimidated by candy-making, you’re not alone. The beauty of chocolate covered peanut butter balls is that you don’t need fancy equipment or complicated techniques. Just follow a simple process and you’ll end up with candy-shop quality treats.
Preparing the Peanut Butter Mixture
Start by combining the peanut butter, softened butter, and powdered sugar in a large mixing bowl. Using a hand mixer or stand mixer will help you achieve a smooth, uniform texture without overworking the ingredients. The goal is a dough that holds its shape but is still easy to scoop and roll.
Once you’ve reached the right consistency, place the mixture into the refrigerator for about 30 minutes. Chilling it makes the next step easier and helps the peanut butter balls hold their shape when you dip them in chocolate.
Rolling and Shaping
When the peanut butter dough is firm enough, it’s time to roll. Scoop out even portions using a small cookie scoop or tablespoon. Roll each one between your palms until smooth and round. Place the rolled balls onto a baking sheet lined with parchment paper or wax paper.
Once all the peanut butter balls are shaped, refrigerate them for another 30 minutes, or until they’re firm. This step ensures that they won’t fall apart when dipped in hot melted chocolate.
Melting and Dipping Chocolate
While the peanut butter balls chill, melt your chocolate chips. Using a microwave or double boiler works fine, but make sure to stir the chocolate often to prevent burning. Adding coconut oil or shortening helps to thin the chocolate, giving you a smooth coating that sets perfectly.
Once melted, use a toothpick or fork to dip each peanut butter ball into the chocolate, letting the excess drip off before placing it back on the lined baking sheet. Chill the dipped balls once more until the chocolate sets, and you’ve got yourself a homemade treat that looks as good as it tastes.
Tips and Tricks for Perfect Peanut Butter Balls
Like any great recipe, success comes down to the details. Here are a few tips to make sure your chocolate covered peanut butter balls turn out flawless:
- Always chill the peanut butter balls before dipping to help maintain their shape.
- Use parchment or wax paper to prevent sticking.
- Opt for a high-quality semi-sweet or dark chocolate for superior taste and a professional look.
- If you want a thicker chocolate shell, double dip after the first layer sets.
These small adjustments can turn a good batch into a great one, especially if you’re planning to give them as gifts or serve them at a party.
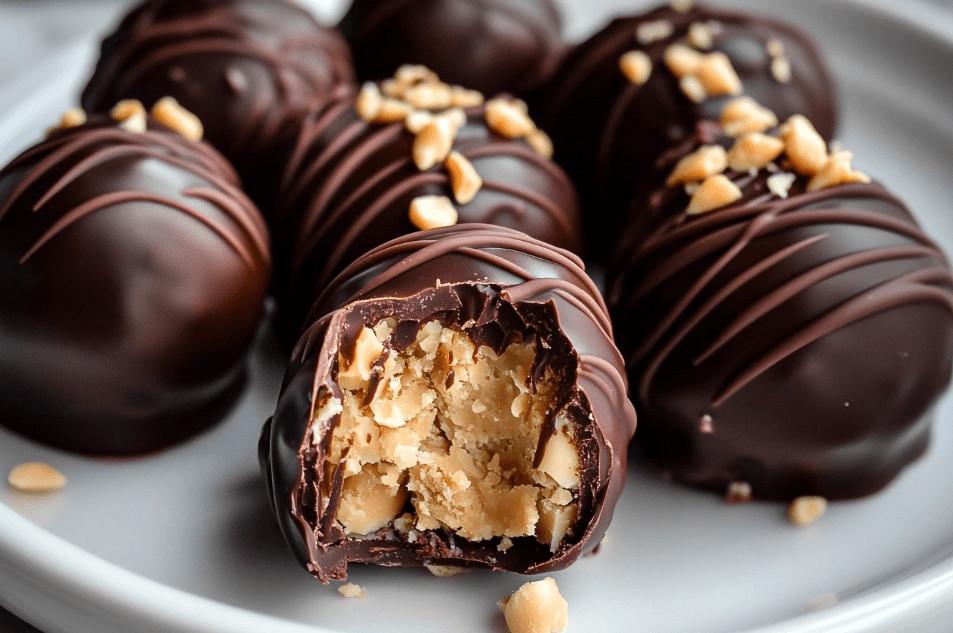
Creative Variations to Try
Once you’ve mastered the classic version, you can start experimenting with different flavors and textures. Here are some ways to switch things up:
- Swap semi-sweet chocolate for milk, white, or dark chocolate.
- Add rice cereal or crushed graham crackers to the peanut butter mixture for crunch.
- Sprinkle sea salt on top before the chocolate hardens for a gourmet finish.
- Use almond butter or cashew butter for a twist on the original.
- Drizzle contrasting chocolate over the set balls for decoration.
These variations allow you to tailor the recipe to your mood, your pantry, or the occasion.
When and Where to Serve Chocolate Covered Peanut Butter Balls
One of the best things about chocolate covered peanut butter balls is how versatile they are. Whether you’re making them for the holidays or just a weekend treat, they fit right into almost any celebration.
Here are a few occasions where these bite-sized treats shine:
- Holiday cookie platters, especially during Christmas and Thanksgiving.
- Birthday parties, baby showers, or potlucks.
- As part of a homemade candy gift box.
- Midweek snacks to curb your sweet tooth without a trip to the store.
Because they store so well in the fridge or freezer, you can make a large batch in advance and have a sweet reward ready whenever you need it.
Nutrition Facts: Chocolate Covered Peanut Butter Balls
It’s always smart to know what you’re indulging in. Here’s a rough breakdown of the nutrition per peanut butter ball:
| Serving Size | Calories | Carbs | Protein | Fat |
|---|---|---|---|---|
| 1 Ball | ~100 kcal | ~9g | ~2g | ~7g |
This gives you the freedom to enjoy them in moderation or adjust the portion size to suit your goals.
Now that you’ve nailed the basics, it’s time to elevate your chocolate covered peanut butter balls beyond the classic recipe. You already know these treats deliver the perfect balance of salty peanut butter and rich chocolate, but the real fun starts when you learn how to customize, present, and share them.
Whether you’re aiming to impress at a family gathering, preparing a holiday cookie tray, or building an edible gift basket, these little bites can steal the spotlight. So let’s go deeper into ways you can make them your signature homemade candy.
The Secret to Mastering Chocolate and Peanut Butter Ratios
One of the most common questions you’ll run into when making chocolate covered peanut butter balls is how to get the filling and coating ratio just right. You don’t want a thin shell that cracks or melts too easily, but you also don’t want to overwhelm the peanut butter with too much chocolate.
Here’s how you can fine-tune the ratio:
- Use a small cookie scoop to portion the peanut butter filling evenly.
- Chill the peanut butter mixture long enough for it to hold shape before dipping.
- Use tempered chocolate or add coconut oil to melted chocolate for smoother coating.
- Allow excess chocolate to drip off completely before placing the ball on parchment.
These small adjustments give your homemade peanut butter balls the polished look and taste of store-bought confections — without the extra cost or preservatives.
Make-Ahead and Storage Tips for Busy Weeks
When life gets busy, having a homemade treat stashed away in the fridge or freezer can be a lifesaver. Chocolate covered peanut butter balls are ideal for this, especially if you like to batch-prep snacks ahead of time.
Here’s how to store them properly:
- Keep in an airtight container in the refrigerator for up to 2 weeks.
- Freeze them in a single layer before transferring to freezer-safe bags or containers for up to 3 months.
- Thaw at room temperature for about 20 minutes before serving if frozen.
If you’re planning to give them as gifts, storing them cold before packaging helps them hold their shape and freshness.
Pairing Chocolate Peanut Butter Balls with Beverages
These treats don’t have to stand alone. Pairing them with the right drink makes the experience even better. Here are a few pairings to try:
- Coffee: The bitterness of black coffee contrasts perfectly with the sweetness.
- Milk: A timeless classic for a reason, milk softens the richness of both chocolate and peanut butter.
- Peanut Butter and Chocolate Smoothie: For a drinkable version of the same flavor profile, try this Peanut Butter and Chocolate Smoothie recipe from Let’s Do Recipes. It’s the ultimate treat to sip on while you indulge in a few of your homemade peanut butter balls.
This kind of pairing not only satisfies your sweet tooth but also makes snack time feel more intentional and comforting.
A Gift-Worthy Treat: Packaging Ideas
If you’ve ever been stuck for a thoughtful, affordable gift, homemade peanut butter balls might be the answer. A batch wrapped with care turns into the perfect present for holidays, birthdays, or “just because” moments.
Here’s how you can package them for a polished look:
- Use mini cupcake liners to separate each ball in a gift box.
- Place them in a clear cellophane bag tied with a ribbon for a festive touch.
- Add a handwritten label listing the flavors or ingredients for a personal touch.
Not only will your friends and family appreciate the effort, but you’ll avoid the overpriced, mass-produced candy aisles at the store altogether.
More Peanut Butter Ball Inspiration
If you want to explore more ways to make these treats, you’ll find plenty of helpful ideas and alternative methods over at She Wears Many Hats. This recipe variation sticks to the roots of the chocolate-peanut butter combo but introduces little tweaks to help you fine-tune your technique.
Whether you’re a fan of creamy or crunchy textures, dark or white chocolate coatings, or even vegan-friendly substitutions, the basics remain the same. Once you understand the foundation, it’s easy to customize the recipe for every occasion.
Serving Chocolate Covered Peanut Butter Balls at Special Events
Once you start making these, you’ll find they fit seamlessly into almost any celebration:
- Weddings and Baby Showers: Arrange them on dessert platters or wrap them as edible favors.
- Holiday Parties: Use sprinkles, colored candy melts, or crushed peppermint for seasonal flair.
- Potlucks and Bake Sales: Pack them in cupcake liners for easy portion control.
- Corporate Gifts: Present them in a sleek box with a ribbon for a professional yet personal touch.
These small candies might look simple, but they deliver big flavor and plenty of visual appeal when served with care.
Why Homemade Always Wins
When you choose to make chocolate covered peanut butter balls at home, you do more than save money — you also choose quality. You can control each ingredient, avoid preservatives, and even make health-conscious substitutions like reduced sugar or dairy-free chocolate.
Plus, there’s a creative satisfaction that comes from watching something simple like peanut butter and chocolate transform into a dessert that looks like it came from a professional chocolatier.
Frequently Asked Questions (FAQ)
Are chocolate covered peanut butter balls gluten-free?
Most versions of this recipe are naturally gluten-free, especially when you stick to classic peanut butter, powdered sugar, and chocolate. However, it’s always wise to check the labels on your chocolate chips and peanut butter to make sure no hidden gluten sneaks in.
How can you prevent chocolate covered peanut butter balls from cracking?
Cracks often happen when the chocolate sets too fast on a surface that’s too cold or when the peanut butter filling is too firm. Let the dipped balls sit at room temperature for 2–3 minutes before moving them to the fridge for final setting.
Can you make peanut butter balls vegan?
Yes, you can substitute the butter for coconut oil or plant-based margarine and use dairy-free chocolate chips. Make sure your peanut butter is free from added milk derivatives, and you’ve got yourself a vegan-friendly version.
Can you make peanut butter balls with crunchy peanut butter?
Absolutely. If you prefer extra texture, crunchy peanut butter works beautifully. You can also mix in chopped peanuts or rice cereal for even more crunch.
Final Thoughts
When you make chocolate covered peanut butter balls at home, you do more than create a snack — you create a moment. Whether it’s nostalgia from childhood, the pride of mastering a new recipe, or the simple pleasure of sharing a homemade gift, this treat connects you to something sweet in more ways than one.
The best part? You can start today. Once you’ve made your first batch, you’ll see just how easy it is to impress yourself and everyone around you. If you’re curious about adding more peanut butter-based recipes to your kitchen, don’t miss this guide for extra variations or explore a refreshing peanut butter and chocolate smoothie to sip alongside your homemade candy.
So grab your ingredients, clear a little space on your countertop, and start rolling. The perfect chocolate covered peanut butter ball is just a few steps away.
6 thoughts on “Chocolate Covered Peanut Butter Balls: Your Ultimate No-Bake Indulgence”